Document Actions
Viewing Images

|


|
There are several tools on the View toolbar as well as on the View menu that can help you see your image in a way that works best for you. For example, when you are despeckling an image, you may want to see the image with a large magnification so you can see the tiny speckles. On the other hand, if you are planning to change the document margins, you likely will want to zoom out so that the whole page is in view. ELAN Capture has several methods to help you get to the magnification you need quickly.
![]()
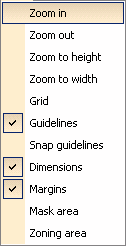
View Menu and View Toolbar
Zoom In ![]()
You can zoom in and increase the size of the image on your screen by:
| • | Clicking on the Zoom In button |
| • | Selecting Zoom in from the View menu |
| • | Pressing the "+" key on your keyboard (you may need to click inside the image pane to make it active first). |
Zoom Out ![]()
Likewise, you can make the image appear smaller by:
| • | Clicking the Zoom Out button |
| • | Selecting Zoom out from the View menu |
| • | Pressing the "-" key on your keyboard. |
Zoom to Height ![]()
This command will change the zoom level so that the entire height of the document will be visible.
Zoom to Width ![]()
Choose Zoom to Width to display the whole width of the document image.
Show-Hide Gridlines ![]()
Gridlines are faint lines displayed on your image to help you see the exact position of objects on your image. Clicking on the Gridlines button will display them. Click the button again to hide them.
Guidelines
You can have ELAN Capture size the image to fit on a printed page in the Page Setup dialog. When you do, you can also specify the dimensions of the margins. You can specify it in the Page Setup dialog, or you can display the guidelines and drag these blue lines to the appropriate position.
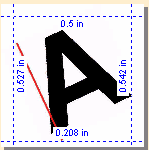
Blue Guidelines Displayed on Image (with Dimensions)
Snap to Guidelines
When you need to position an image element very precisely, use the Snap to Guidelines to help you.
| 1. | On the View menu, select Snap Guidelines. |
| 2. | Drag the guidlines to the exact coordinates you need. (You might want to display Dimensions to see the measurements.) |
| 3. | Make a selection using the Select tool or Detect Selected Area tool. |
| 4. | Press Crtl+Arrow to snap the selection to the guidelines. |
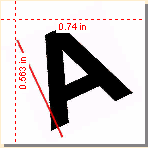
Red Snap Guidelines Displayed on Image (with Dimensions)
Dimensions
When you enable dimensions, the numerical value of the guidelines are displayed on the image. (See illustrations above.)
Margins
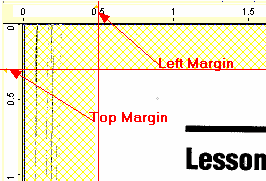
Yellow Shaded Area Indicates Image Margin
|
Previous
Main
Next
|
© 2002-2009 ELAN GMK