Document Actions
Tree Levels Toolbar

|


|
Another way to build a tree hierarchy is with the Tree Levels toolbar. This is an alternative way of indicating levels of separation in your scanning job without the use of a barcode separator sheet. Generally speaking, if there are many pages between separations, it likely will be faster to use barcode separator sheets; whereas if the separations happen every one or two pages, it may be faster to use the software to indicate the breaks. You also might use this toolbar in addition to barcode separators in the case where a sheet was left out by mistake.
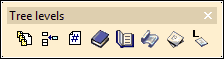
Tree Levels Toolbar
If this toolbar is not visible, right-click anywhere in the job tree area, select Toolbars and then select Tree Hierarchy Levels.
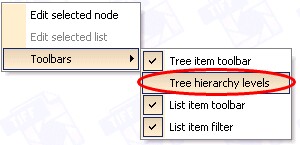
Enabling the Tree Hierarchy Levels Toolbar
To insert a level:
| 1. | Click on the image where you would like the new level to begin. |
| 2. | Then click the appropriate icon for the level you desire. |
![]() - Level 0 (Book)
- Level 0 (Book)
![]() - Level 1 (Chapter)
- Level 1 (Chapter)
![]() - Level 2 (Sub-chapter)
- Level 2 (Sub-chapter)
![]() - Level 3 (Part)
- Level 3 (Part)
![]() - Level 4 (Section)
- Level 4 (Section)
Level Captions
The names in parentheses are the default captions. That is to say, when you click on the level button, a default caption will be added for you. You are free to modify these captions on the tree itself after you have inserted the levels by double-clicking on the text in the tree. You may also modify the default captions by clicking on the Setup Hierarchy Levels button ![]() . You may change the text on each of these lines. The first line represents level 1, the next is level 2, and so on. (5 levels are recognized.)
. You may change the text on each of these lines. The first line represents level 1, the next is level 2, and so on. (5 levels are recognized.)

Hierarchy Levels Dialog
When you have finished modifying the default captions, click OK to save your changes or Cancel to close the dialog box without saving.
|
Previous
Main
Next
|
© 2002-2009 ELAN GMK