Manipulating Tree Objects

|


|
The Tree Nodes toolbar helps you manipulate nodes (objects) in the tree.

The Tree Nodes Toolbar
If you do not see the Tree Nodes toolbar, right-click anywhere on the Hierarchy area. Select Toolbars and then Tree item toolbar.
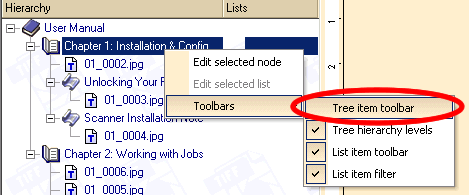
Displaying the Tree Item Toolbar
Move Up ![]()
Click on an image or a tree level icon and click the Move Up button to increase the item's order in the tree.
Move Down ![]()
Similarly, to lower an item's position in the tree, click on it and then click the Move Down button.
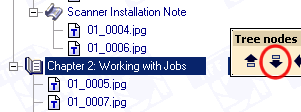
Moving Chapter 2 Node Down
Decrease Level ![]()
This applies only to the node objects. You can decrease a node's level by selecting it and clicking on the Decrease Level button. In the illustration below, the "Scanner Installation Note" was moved from level 2 (sub-chapter), was decreased to level 1 (chapter).

Decreasing the Level of the Scanner Installation Note
Increase Level ![]()
The Increase Level button will move your node deeper the tree.
| 1. | Click on the node to move to select it. |
| 2. | Click the Increase Level button. |
Delete ![]()
Use this button to delete an image or a node from the tree.
| 1. | Select the item to be deleted. |
| 2. | Click the Delete button. |
Please note that only the one selected line item will be removed from the tree - none of the sub-items will be deleted. This may result in a "correction level". ELAN Capture inserts a correction level when there's a gap in the levels. In the picture below, a Level 1 node was deleted from the tree when there were still level 2 and 3 nodes. ELAN Capture inserted a Correction Level placeholder to draw your attention to this problem.
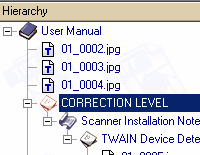
Illustration of a Correction Level
Undo ![]()
You can undo the last command you gave from the tree node toolbar by clicking the Undo button.
Tip: if you want to experiment with many changes to your tree, save your job first. Then if you want to revert to the previous state of the tree, close the job (without saving) and re-open it.
Clear Tree ![]()
This command will remove from the tree the non-image information you specify in the dialog box that follows. When you click on the Clear Tree button, the Clear Tree dialog will open. You have three options to select:
| • | Clear table of contents will remove all the levels and leave just the images. |
| • | Clear lists will remove all the index information you have added. |
| • | Create new levels will add a level 1 node at the top of your image tree. (Use the Move buttons to move the level to the appropriate location.) There are two default node names in the text box: "COVER" and "TOC". You are free to change these if you like. |
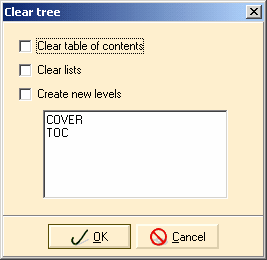
Clear Tree Dialog
Click OK to instruct ELAN Capture to carry out your clear tree instruction, or click Cancel to close the dialog box without making the change.
Toggle Error State ![]()
If you have a correction level, you need to rename the caption and then click the Toggle Error State button to change the icon from a red error icon to a standard level icon.
In the illustration below on the left, the error level has been renamed. After the Toggle Error State button was clicked, the icon changed back to a standard level one icon.
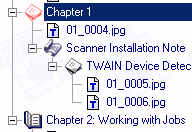
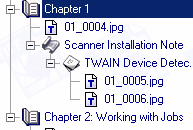
Before and After Images of Using the Toggle Error State Button
You can also mark regular levels as errors if you need to flag them to be reviewed for some reason.
|
Previous
Main
Next
|
© 2002-2009 ELAN GMK