Image Tools

|


|
The following tools enable powerful automated image processing functionality such as optical character recognition, automatic deskewing, automatic page detection and more. We recommend that you review these tools so that you can employ them whenever the image processing job requires such features.
![]()
Image Tools Toolbar
Select Area ![]()
This tool creates a selection for OCR purposes. It indicates an area of text that is to be interpreted by ELAN Capture.
When you use this tool, the selected area has a dotted blue line around it.
![]()
Dotted Blue Line Representing an Area Selected for OCR
Select ![]()
Use this tool to select a portion of the image to be changed. For example, you may want to drag a part of an image from one area of a page to another. When you use this tool, the selected part of the image has a solid blue line around it.
![]()
Solid Blue Line Representing an Area Selected for Movement
Hint: to move a selection between image files, use Cut, Copy and Paste tools.
Text ![]()
You can add text to your image quickly and easily. Simply click on the Text tool, click on the image where you want to add text, and start typing.
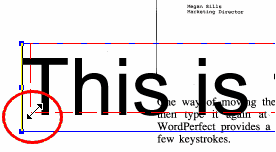
Tip: To adjust the font size, click on the handles of the text box and drag to the desired height.

Grabbing the Text Handle and Decreasing the Font Size
Detect Page ![]()
Use this button to have ELAN Capture detect the borders of your image. This is useful for working with margins, adjusting page sizes and so on. Simply click on the Detect Page button and ELAN Capture will put a solid blue line around the edges of your image. Note that this solid blue line also indicates a selection that you can move, cut, copy and paste.
Detect Selected Area ![]()
This button is helpful for removing white space from the edges of your selection. Once you have made a selection, click the Detect Selected Area, and ELAN Capture will redraw your selection borders tightly around the image elements.
Page Setup ![]()
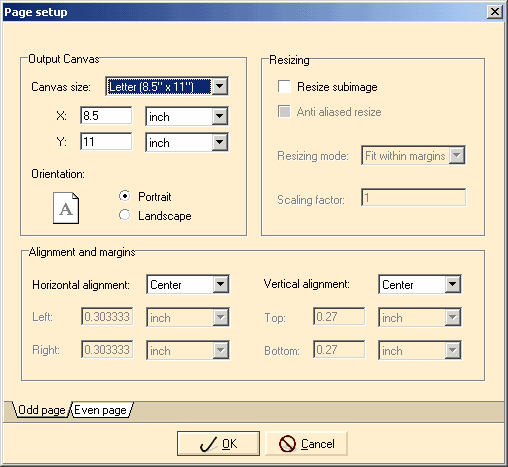
Click this button to modify the margins, paper size and orientation for your document. This would be useful, for example, if you had an image of a canceled check that you wanted to print on a letter-sized page. When you click on the Page Setup button, the following dialog box will open:

Page Setup
Output Canvas: the characteristics of the page you wish to use when converting these images to PDF. In many cases, this is the same as the image size itself, but not always. In those special cases, you can choose a standard canvas size, indicate a custom canvas size, and choose the orientation.
Resizing: You can have ELAN Capture shrink or enlarge your scanned image when it is converted to PDF. When you check the "Resize Subimage" box, the rest of the Resizing and Alignment and margin section become enabled.
| • | Anti-aliased resize: Anti-aliasing smooths out the jagged edges between solid colors. Because the process adds more intermediate colors, the image becomes much less compressible (file size increases). |
| • | Resizing mode: Choose between fit within margins and fixed scaling. If you choose the latter, be sure to indicate the scaling factor directly below. |
Alignment and margins: these settings only apply if you have checked the Resize Subimage box. They allow you to position your image precisely on the canvas of the converted document.
Odd and Even Pages: Page settings for odd and even pages are kept separate - so remember to indicate your page setup choices on both tabs.
OCR Selected Area ![]()
OCR is short for optical character recognition, and ELAN Capture has leading character recognition technology to give you superior accuracy when you need to retrieve text from your scanned image.
Note that this tool is only for the selected area on an image. This is helpful for extracting indexing information, for example. However, if you want the text from the entire job, indicate "Image + Text" when you convert your job to PDF.
Save ![]()
Use the Save button to save changes you have made to your image.
Auto-Deskew ![]()
Frequently an image will feed into the scanner at something less than an exact straight angle. Auto-deskew will detect the image, calculate the degree of skew on the page, and rotate the image back to a right angle.
Tip: Use a multiple image selection to deskew many images at once.
Deskew ![]()
If you prefer to deskew your images manually, ELAN Capture will help you find the angle you need.
| 1. | Select the page or pages you want to deskew. |
| 2. | Click the Deskew button in the Tools toolbar. |
| 3. | Drag your mouse along a straight line on your image - perhaps a line of text - to indicate the angle you wish to correct. |
| 4. | Release your mouse and ELAN Capture will rotate your image so that the line that you drew is exactly perpendicular with the top and bottom edges of the page. |
|
Previous
Main
Next
|
© 2002-2009 ELAN GMK